
개발일기장
Node.js. Mysql2 Transaction작업 + template만들기 (jdbc방식) 본문
일반적으로 jdbc를 사용하여 트랜잭션을 구현하는 방법을 nodejs mysql2를 사용해서 구현하기.
mysql2를 사용 함미다.
npm i mysql20. 일반적으로 transaction를 처리하려면
0) 하나의 connection을 유지한 상태로
1) transaction시작을 명시
2) 비즈니스 로직 처리
3-1)성공시 commit
3-2)실패시 rollback
4) connection 종료
순서를 유지해야함.
1. 상황
회원의 닉네임에 맞는 pk값이 필요할때
1) 이미 닉네임이 저장되어 있는 경우 -> 바로 찾아오기.
2) 닉네임이 저장되어 있지 않은 경우 -> 저장하고 pk값 받아오기
※ 2의 경우 저장한 result에서 insertID의 값이 반환되는 기능이 이미 있음.
2. 구현
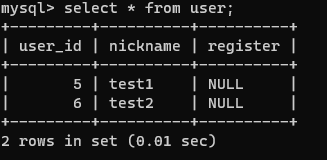
회원테이블
CREATE TABLE `crawler`.`user` (
  `user_id` INT NOT NULL AUTO_INCREMENT,
  `nickname` VARCHAR(45) NOT NULL,
  `register` TIMESTAMP NULL,
  PRIMARY KEY (`user_id`),
  UNIQUE INDEX `nickname_UNIQUE` (`nickname` ASC) VISIBLE)
ENGINE = InnoDB
DEFAULT CHARACTER SET = utf8
COLLATE = utf8_unicode_ci;
getConnection, relaeaseConnection기능을 밖에서 구현한다.
const mysql = require('mysql2/promise');
const pool = mysql.createPool({
    host: process.env.DATABASE_URL,
    user: process.env.DATABASE_USER,
    password: process.env.DATABASE_PASSWORD,
    database: 'crawler',
    connectionLimit: 5,
});

const getConnection = async () => {
    try {
        const conn = await pool.getConnection();
        return conn;
    } catch (error) {
        console.error(`connection error : ${error.message}`);
        return null;
    }
};

const releaseConnection = async (conn) => {
    try {
        await conn.release();
    } catch (error) {
        console.error(`release error : ${error.message}`);
    }
};
1) 회원 찾기
const FIND_USER_BY_NICKNAME_SQL = 'SELECT user_id, nickname, register FROM user WHERE nickname = ?';

const find_user_by_nickname = async (conn, nickname) => {
    try {
        const [rows] = await conn.execute(FIND_USER_BY_NICKNAME_SQL, [nickname]);
        return rows;
    } catch (err) {
        throw err;
    }
};
2) 회원 저장하기
const SAVE_USER_SQL = 'INSERT INTO user (nickname) VALUES (?)';

const save_user = async (conn, nickname) => {
    try {
        const [rows] = await conn.execute(SAVE_USER_SQL, [nickname]);
        return rows;
    } catch (err) {
        throw err;
    }
};
이렇게 connection과 sql에 사용할 파라미터를 받아서 쿼리를 수행한다.
const user_id_cache = {};

const get_user_id = async (nickname) => {
    // 0. 반복되는 닉네임이 많을것이므로 캐시되어있는지 확인한다.
    if (user_id_cache[nickname]) {
        console.log(`use cache ${nickname}`);
        return user_id_cache[nickname];
    }

    let conn = null;
    try {
    	//1. 커넥션 받아오기
        conn = await getConnection();
        //2. 트렌잭션 시작
        await conn.beginTransaction();
		//3. 유저 있는지 확인
        const find_user = await find_user_by_nickname(conn, nickname);

        let user_id = -1;
        //4. 유저가 없으면 저장하기
        if (find_user.length === 0) {
            const new_user = await save_user(conn, nickname);
            user_id = new_user.insertId;
        } else {
        //4-1. 유저가 있으면 그 값 사용하기
            user_id = find_user[0].user_id;
        }

        //5. 인메모리 캐싱을 위해서..(전체 유저 50명도 안될것이라 예상)
        user_id_cache[nickname] = user_id;

        //6. 트랜젝션 종료
        await conn.commit();

        return user_id;
    } catch (err) {
    	//6-1. 문제 발생시 롤백
        if (conn) {
            conn.rollback();
        }

        throw err;
    } finally {
    	//끝나면 커낵션 해제
        if (conn) {
            releaseConnection(conn);
        }
    }
};
JDBC에서 일반적으로 사용했던 방식으로 코드를 구현했다.
그런대 이렇게 하는경우 설정하는 코드들이 너무 복잡하다는 문제점이 있다.
Spring에서는 jdbctemplate이나 JdbcUtils, @Transactional 어노테이션 등을 사용하여 편하게 사용할 수 있지만 NodeJS에서는 그런것을 찾을 수가 없었음...(내가 모르는게 있을지도)
3. 개선 - 커넥션 부분과 비즈니스 로직을 분리
비즈니스 로직을 closure로 만든다음 transaction을 관리하는 곳에서 connection을 넣어주는 방식으로 분리시키면 코드의 중복을 막을 수 있다고 생각했음.
transaction 관리 코드 : business logic에 connection을 넣고 나머지(시작, 커밋, 롤백) 기능을 수행한다.
const transaction = async (logic) => {
    let conn = null;
    try {
        conn = await getConnection();
        await conn.beginTransaction();

    	//connection만 넣어준다.
        const result = await logic(conn);

        await conn.commit();
        return result;
    } catch (err) {
        if (conn) {
            conn.rollback();
        }

        console.error(err);
        return null;
    } finally {
        if (conn) {
            releaseConnection(conn);
        }
    }
};
회원 번호 찾는 로직 : connection을 받아서 실행한다.
const get_user_id = (nickname) => {
    return async (conn) => {
        try {
            if (user_id_cache[nickname]) {
                console.log(`use cache ${nickname}`);
                return user_id_cache[nickname];
            }

            const find_user = await find_user_by_nickname(conn, nickname);
            let user_id = -1;
            if (find_user.length === 0) {
                // -> 해당 닉네임을 가진 유저가 없는 경우
                const new_user = await save_user(conn, nickname);
                user_id = new_user.insertId;
            } else {
                // -> 해당 닉네임을 가진 유저가 있는 경우
                user_id = find_user[0].user_id;
            }

            user_id_cache[nickname] = user_id;

            return user_id;
        } catch (err) {
            throw err;
        }
    };
};
실행결과 :
const {transaction} = require('./database/transactionTemplate');
const {get_user_id} = require('./service/user.service2');


async function run() {
    const res1 = await transaction(get_user_id("test_nickname1"));
    const res2 = await transaction(get_user_id("test_nickname2"));
    const res3 = await transaction(get_user_id("test_nickname1"));

    console.log(res1, res2, res3);
}

run();
auto increment니깐 7,8,7이 출력되어야함.
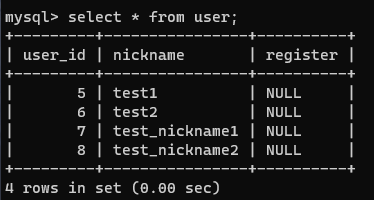
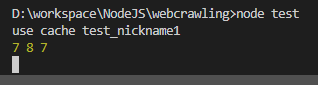
잘된다.
4. 결론
Spring에서는 connection을 threadlocal을 사용하여 하나의 thread에서 transaction을 유지해주는 기능이 있다는데
Node는 그런게 있는지 모르겠다. 더 찾아봐야겠음
그리고 코드가 조금 더러운거같은데 더 깔끔하게 재사용가능하게 해봐야겠다.
https://github.com/tlqckd0/web-crawling
GitHub - tlqckd0/web-crawling: web-crawling & analysis
web-crawling & analysis. Contribute to tlqckd0/web-crawling development by creating an account on GitHub.
github.com
'node.js' 카테고리의 다른 글
| ExpressJS에 inversify적용해서 객체 주입받기. (0) | 2022.08.04 |
|---|---|
| expressJS 를 class형식으로 실행 (0) | 2022.07.28 |
| Node.JS 웹 크롤링으로 Promise.all 성능 비교 (수정: 이거 다 틀렸음) (0) | 2022.05.18 |
| Node.JS로 웹 크롤링 하기. puppeteer, cheerio, 동적 크롤링 (0) | 2022.05.18 |
| Node.js에서 RabbitMQ(AMQP) 사용하기. Consume (3) (0) | 2021.07.28 |

